Vehicle Dynamics Simulation in Action – Maranello Motorsport Victory in the Bathurst 12 hour
This guest contribution on the Altair Blog is written by the ChassisSim Team. ChassisSim is a member of the Altair Partner Alliance
One of the greatest misconceptions in car vehicle dynamics is the view that race cars and road cars are completely disconnected. While this may hold some validity for formulas such as Formula 1, DTM and LMP1 these are the exceptions that prove the rule due to the large downforce numbers these cars run. When you do the numbers on a lot of formula the difference between a road and race car is quite narrow. In particular there are many parallels between Hypercars and FIA GT3 class Race Cars.
A particular relevant case in point occurred on February 9, 2014. A ChassisSim customer, Maranello Motorsport running a Ferrari F458 GT3 won the Bathurst 12 hour at the Mount Panorama circuit at Bathurst, NSW Australia. What made this victory even more significant is that the race engineering staff where experienced ChassisSim users. In particular the chief race engineer Pat Cahill is my Australian Dealer. Consequently, I had a front row seat on what they did.
What we’ll be discussing in this article is the role that ChassisSim played in this victory and how it was used. This is particular appropriate because the tools used in this victory have a direct application for use in road cars. Also, another thing to note here, is due to its rough and undulating nature Bathurst represents an ideal test case scenario. If a car can survive and excel at Bathurst, it will survive and excel any where.
Also let me state from the get-go I will not be discussing any particular setup parameters of this car. When I have a customer or colleague who divines a setup that works, as far as I am concerned it is their property and not for public consumption.
As always, any victory starts with preparation and what went down with the Ferrari F458 is no exception. The first step in ChassisSim was the 7 post/shaker rig toolbox. This toolbox allows you to look at the dynamics of the car in the frequency as opposed to the time domain.
The first part of the toolbox is setting up the frequency test. This is illustrated in Fig-1,
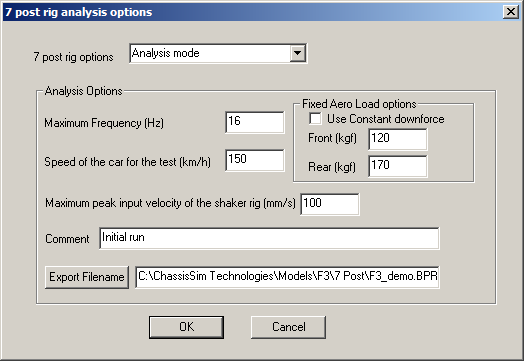
Fig-1 – Setting up a frequency run
The comments and filenames are pretty self explanatory. Just put in something relevant to the setup and store the log file for test where you are going to remember it. However, the controls you need to pay attention to are the speed of the test and the peak input velocity of the road input.
You choose the speed of the test to choose the corners you want to simulate. If you want to simulate a low speed corner choose say 100 km/h, or if you are looking at a high speed corner you choose say 150 – 170 km/h. For example, at Bathurst and its 280kmh kink at Caltex Chase, a speed of 270kmh was used and a 210kmh test speed was used for the very fast, flowing section around McPhillamy Park. These speeds represent the apex speeds encountered. You’ll also notice you have an option to set the downforce at a fixed value. This is ok for validation work, but personally I prefer to leave this off. The reason is that the ride height map will have impact on the frequency response of the car and in high speed corners this will make its presence felt.
In terms of the peak input velocity you choose a value that represents the peak input velocity that is representative of the road input. There are a number of ways you can do this. For a rough rule of thumb, 50 mm/s approximates a relatively smooth surface, 100mm/s is middle of the road, and 150mm/s represents a pretty bumpy circuit. Another way you can do it is to look at the data. Look at the peak damper velocity and divide the results by say about 3. It’s a rough measure but it will get you by. If in doubt start the test at 100mm/s. To quantify this approach Mt Panorama was resurfaced over Christmas of 2013 and the circuit operators claimed it was much smoother. Consequently, the input was scaled to 75% of what was used on the old surface. This was an educated guess that was based on how much the Phillip Island circuit surface improved after a similar resurface.
In terms of what this toolbox is it will return a plot of Output Amplitude on input Amplitude. The output of the toolbox is shown in Fig-2.
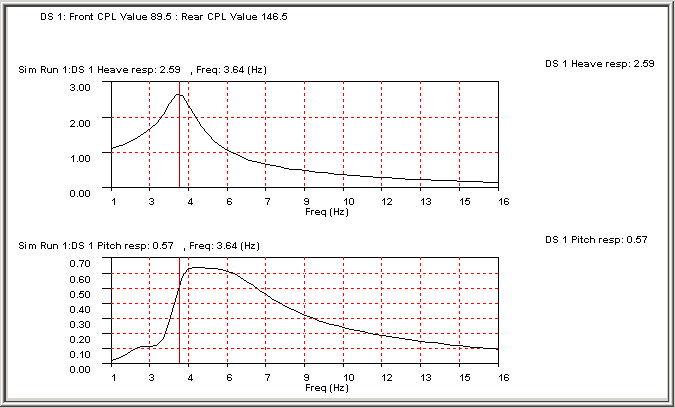
Fig-2 – Output of the shaker rig toolbox
You’ll see that the Contact Patch Load variation (CPL) is shown in the top of the graph. This is averaged over the whole frequency run and the units are kg. This is the delta load variation from the static load for the conditions specified for the test. The plots below are the ratio of output vs input amplitudes. Here we have shown heave and pitch for a heave input to the car.
Now let’s get to the meat of this which is how it was used by Maranello Motorsport. The first part of the process is that you play with springs and large damper adjustments to minimize CPL. What will happen is that you will get into a zone where the CPL will hit a minimum and actually won’t vary too much. Once you hit this you start playing with minor spring and damper changes to get the shape of the frequency response that you want. It’s actually that simple. This results in a marked improvement in mechanical grip without compromising driver feel. The other key thing to re highlight is that you choose a corner speed and input velocity that is appropriate for a particular corner you want to analyse.
What we have just described is the method by which the damper curves for this car got specified. I realize that a few of you might be looking at this with a level of stunned disbelief but it really is that simple. All we are doing is running a bunch of shaker rig tests and looking at a combination of CPL values and frequency plots to determine what we need. It’s amazing what happens when you do your homework.
The next step in the process was the lap time simulation work. What made this year interesting was the fact the Bathurst track surface had been resurfaced as we discussed previously. If this was Formula 1 the solution would be to spend approximately $150,000 in creating a 3D track map. Good luck. When Bathurst is not being used as a race track it’s actually a scenic drive (with more speed cameras per kilometer than any other road in Australia!). Rather the solution adopted was to use the ChassisSim bump profiling toolbox to grab a surface profile from the first session. For those of you not familiar with ChassisSim this is actually ChassisSim 101.
However, what was really interesting was the results from these first simulations. This is illustrated in Fig-3.
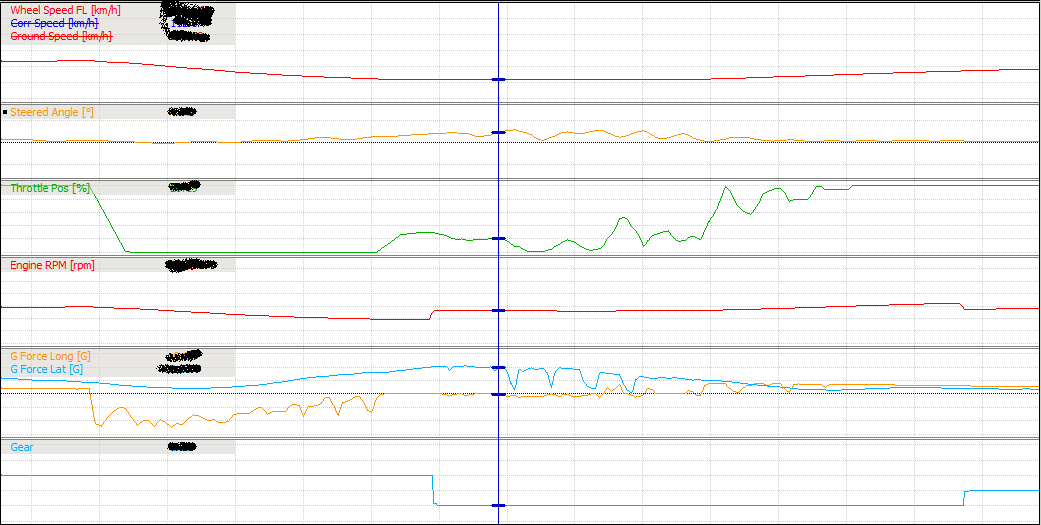
Fig-3 – Initial simulation results
What can be seen here is some waviness in the steering. Due to confidentiality all scaling and numbers have had to be removed. At first this was almost dismissed as ChassisSim driving the car too hard. However, driver feedback indicated the car was very pointy. Not so much oversteering in the classical sense but very sensitive to steering input. The fact this was mirrored in the simulation results and this shows you what a powerful tool you have at your hands with the bump profile modeling toolbox. It also shows you the jump between static and transient lap time simulation.
The other way that ChassisSim was employed was to use ChassisSim to predict hot tyre temperatures and pressures. This has been released for over a year, but it has seen very little use in the field until now. What this feature does is in addition to calculating the idealised surface temperature it will also calculate the core temperature and the core pressure. This has been under testing for the last year and the Bathurst 12 hour was the first time it was used in competition.
This feature is a spin of the open loop track replay simulation of ChassisSim. There are two steps to this process. The first step is to grab the necessary number of laps with the appropriate monster files exported at 50Hz. This forms the input of the track replay simulation. When the open loop simulation is running it’s effectively the same as the tyre force modeling and lap time simulation. You then specify a cold start point for temperatures and pressures, the hot end point and the no of laps you run. ChassisSim will then determine the internal temperature parameters of the tyres for you. When this is setup you’ll have a dialog that looks like this
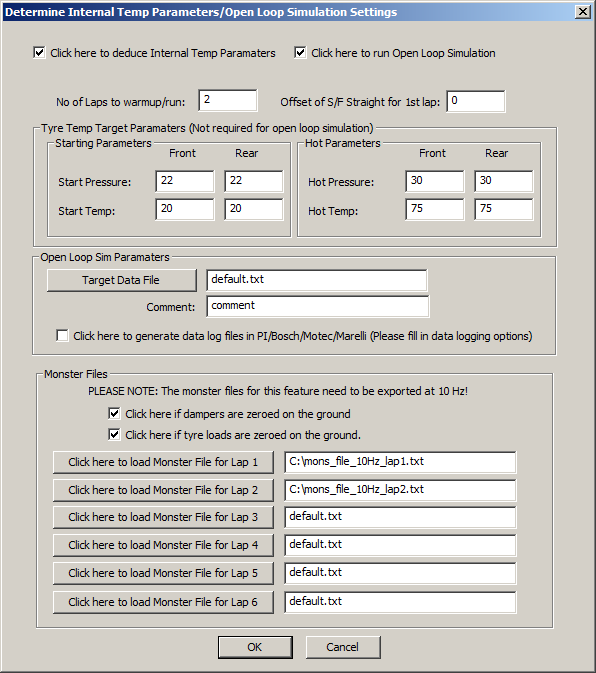
Fig- 4 – Determining Internal temp parameters
The next step is to apply them to the vehicle model and run the open loop simulation to determine the internal tyre temps and pressures. When you have run the open loop and track replay simulation you should have a plot that looks like this:
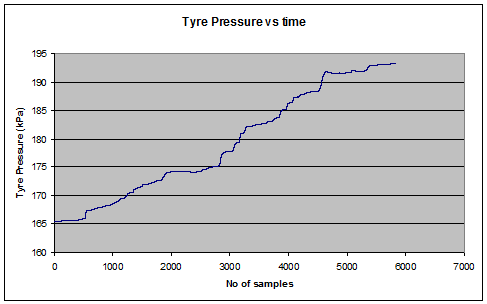
Fig – 5 Plot of Tyre Pressure vs time
Let me state from the get-go that what you are seeing here shouldn’t be taken as gospel to be used blindly. Predicting tyre pressures and knowing how to set them up is one of the real arts of race engineering. Rather use this as a tool to point you in the right direction.
Where this was used at the Bathurst 12 hour was a predictive tool to replicate what was happening with tyre pressure growth over a stint. The remarkably hot conditions made this imperative and allowed the drivers to lap consistently faster than everyone in the middle part of the day when the ambient temperature reached 39 deg C and the track temp was 65 deg C. In terms of what was found I need to be very tight lipped about it. What I can say is it proved to be a very effective tool and it used the elements we discussed above.
Tying all this together and what we have discussed here hasn’t been rocket science. Rather by using ChassisSim as part of many tools the race engineering staff at Maranello motorsport where able to chip away at the car and refine the setup. However, tools such as the 7-post/shaker rig toolbox, the lap time simulation and the open loop/track replay simulation to help predict tyre pressures certainly made their presence felt.
This also illustrates the point that if you are going to use something like ChassisSim effectively you use it as a tool. You don’t use it as a magic wand. What we have discussed here requires you to look at the results and use your experience and training to figure out what it is telling you. This goes to the real heart about how to use simulation. One of the greatest fallacies I see with simulation is people trying to use it blindly like a magic wrench. If that sounds like you don’t bother using simulation tools and I wish you well. Rather the way you use simulation is to throw a few things at it and then sit back and think about what it just told you.
This was the way ChassisSim was used by the engineering team at Maranello motorsport. The model had been refined to a point where it could be trusted, even when the drivers all came back after the first practice with a bewildering myriad of handling ills. At this point, it’s often the case that changes start being made in big jumps, which is understandable. Instead, the engineering team could say with confidence that it was mostly a very green and dusty track and it would be best to reserve judgment until later in the day.
Consequently, more time was spent on the drivers focusing on themselves and getting up to speed on a circuit they usually can’t practice on in anger. This proved to be the most powerful advantage of ChassisSim. This was proven with a qualifying time that was only beaten by a few hundredths by a car running on softer rubber. All for a sum total of three setup changes to the car for the duration of the weekend.
Also, the other thing to add is that everything we have discussed here can plug straight in to road car analysis. For example, one of the consequences of minimizing contact patch load variation while getting the curve response you want is one of the holy grails of road car handling. That is a car that rides well without the handling characteristics of a cruise liner on valium. Another case in point is the ability to look at the steering traces which will be a great indicator of how responsive a road car is to steering input.
In closing, ChassisSim played an important role in the Maranello Motorsport victory in the Bathurst 12 hour in 2014. The shaker rig toolbox, the lap time simulation and the open loop/track replay simulation all played their part. However, the real key here is that ChassisSim was used as a calculator to inform the engineers about where to go with the car. If you use simulation this way you will have to access an extremely powerful tool and as discussed this translates directly to road car use.